How To Go Completely Invisible On Facebook

Advertisement

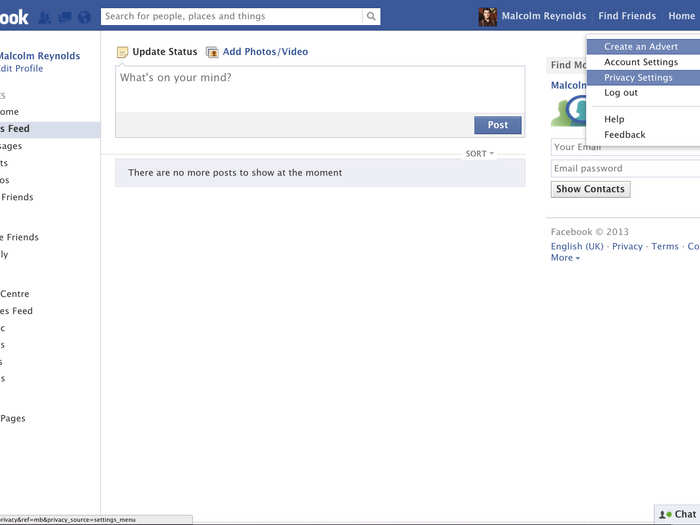
To get started, click on the cog in the upper right corner and select "Privacy Settings."

To get started, click on the cog in the upper right corner and select "Privacy Settings."
Advertisement

To change your privacy settings, you'll always click the "edit" button located to the right of each setting. Once you are done making changes, clicking "close" will exit you out of each individual section.

To change your privacy settings, you'll always click the "edit" button located to the right of each setting. Once you are done making changes, clicking "close" will exit you out of each individual section.
Advertisement

For the most stringent settings, select the drop down menu and select "only me." This ensure no one but you can see your future posts.

For the most stringent settings, select the drop down menu and select "only me." This ensure no one but you can see your future posts.

Next up, you can make it so random strangers can't send you friend requests by changing the "Who can send you friend requests" setting to "Friends of friends." Only people already friends with someone you know can now friend request you.

Next up, you can make it so random strangers can't send you friend requests by changing the "Who can send you friend requests" setting to "Friends of friends." Only people already friends with someone you know can now friend request you.
Advertisement

To further shrink from communication with the outside world, you can limit who can send you Facebook messages. Simply select "Strict Filtering" to keep randoms from messaging you.

To further shrink from communication with the outside world, you can limit who can send you Facebook messages. Simply select "Strict Filtering" to keep randoms from messaging you.

Next, to eliminate people from looking you up using the email or phone number you used to sign up for Facebook, select "Friends" from the "Who Can Look Me Up" setting.

Next, to eliminate people from looking you up using the email or phone number you used to sign up for Facebook, select "Friends" from the "Who Can Look Me Up" setting.
Advertisement

This next one is important. Most people can just use Google or other search engines to look up your Facebook profile. In the "Do you want other search engines to link to your Timeline?" setting, unchecking the "Let other search engines link to your timeline" box will stop that.

This next one is important. Most people can just use Google or other search engines to look up your Facebook profile. In the "Do you want other search engines to link to your Timeline?" setting, unchecking the "Let other search engines link to your timeline" box will stop that.

Now that you have your privacy settings taken care of, let's move on to the "Timeline and Tagging" category. You'll find it right below "Privacy Settings" on the left part of your screen.

Now that you have your privacy settings taken care of, let's move on to the "Timeline and Tagging" category. You'll find it right below "Privacy Settings" on the left part of your screen.
Advertisement

You'll use the same technique in this section. Click "edit" next to each of the indicated areas and choose the strictest setting. Click "close" to exit the editing process. Remember, always choose the "Only Me" option when available. If it's not an option, choosing "Friends" is second best.

You'll use the same technique in this section. Click "edit" next to each of the indicated areas and choose the strictest setting. Click "close" to exit the editing process. Remember, always choose the "Only Me"  option when available. If it's not an option, choosing "Friends" is second best.

Once your done, your "Timeline and Tagging" page should look like this. Make sure your settings match up with those indicated in the red circles. Next up, we'll tackle the "Apps" section, located on a few below "Timeline and Tagging."

Once your done, your "Timeline and Tagging" page should look like this. Make sure your settings match up with those indicated in the red circles. Next up, we'll tackle the "Apps" section, located on a few below "Timeline and Tagging."
Advertisement

We're almost done! To disable the "App Platform" — which will prevent apps from gaining access to your personal information — simply click "edit" and turn it off. You'll be met with a list of things that you won't be able to do once it is disabled, such as log in to third party apps using Facebook, so think carefully before taking the plunge.

We're almost done! To disable the "App Platform" — which will prevent apps from gaining access to your personal information — simply click "edit" and turn it off. You'll be met with a list of things that you won't be able to do once it is disabled, such as log in to third party apps using Facebook, so think carefully before taking the plunge.

Once you have turned off the "App platform," you'll notice the Apps menu shrinks. The last category to alter is "Adverts," located directly below "Apps."

Once you have turned off the "App platform," you'll notice the Apps menu shrinks. The last category to alter is "Adverts," located directly below "Apps."
Advertisement

These are the "Adverts" settings. You'll start by clicking "edit" next to each setting.

These are the "Adverts" settings. You'll start by clicking "edit" next to each setting.

Changing the "Third Party Sites" category to "No One" ensures that if Facebook ever allows third party sites to use your picture or name in advertisements, you'll be left out. Switching the "Adverts and Friends" settings to "No One" prevents Facebook from making suggestions to your friends, based one what you have "liked." After that's taken care of, you are officially finished! If you change your mind, you can always go back and change your settings, or alter how strict they are by following the same directions.

Changing the "Third Party Sites" category to "No One" ensures that if Facebook ever allows third party sites to use your picture or name in advertisements, you'll be left out. Switching the "Adverts and Friends" settings to "No One" prevents Facebook from making suggestions to your friends, based one what you have "liked." After that's taken care of, you are officially finished! If you change your mind, you can always go back and change your settings, or alter how strict they are by following the same directions.
Advertisement

Now that you're done hiding your secrets from the Facebook world, why not see how Apple hides theirs?

Now that you're done hiding your secrets from the Facebook world, why not see how Apple hides theirs?

Click here to see the most extreme examples of secrecy at Apple >