I tried every method of heatless curls on the internet. This is by far the best one.

Advertisement
I tried every method of heatless curls on the internet. This is by far the best one.
  • Heatless curls tutorials have exploded in popularity on TikTok.
  • There are many ways to do heatless curls, all of which involve sleeping on them overnight.

One swipe on TikTok will likely have you stumbling across heatless curls, a style that's been sweeping the social media app. There are over two billion videos using the hashtag #heatlesscurls, and 46 million videos tagged as tutorials.

Here's the gist: every method promises a simple, five-minute time investment to prepare the hair and wrap the curls. Using (mostly) things you've probably got around the house, you wrap your hair, sleep on it, and wake up with bouncy, natural-looking hair with minimal effort and without incurring any heat damage from styling tools.

Or at least that's the idea.

This laziness spoke to me—I'm a working mom with very little time to myself. I tested seven methods to find out which would give me the best heatless curls. I started each method with damp hair and a small amount of product, as recommended by Jessica Joslin, an Atlanta-based hairstylist.

"It's not necessary to use a heat protectant," she told Insider, "but a good mousse can make a difference." Joslin advised me to separate the hair and pin it away while working on other sections. "Not sectioning prior to wrapping can make something that's easy seem difficult."

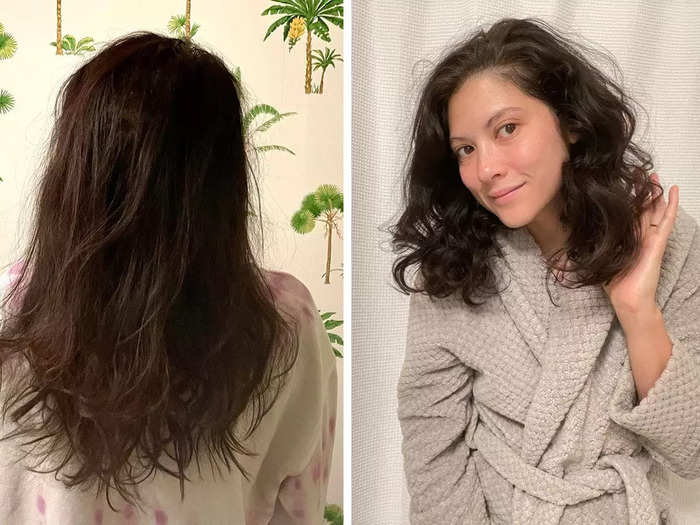
I have thin hair but a lot of it, so I was worried about it not being the right "type" of hair for heatless curls, as many of the girls on TikTok have thick strands. "Hair type plays a big role," Joslin said, noting that certain methods will work better for certain hair types, and it might take some time to figure out which works best for you.

I gathered my hair before setting it for each except the chopstick and sock method. Every time I wrapped one section, I incorporated it into the next, ensuring I was pulling tightly. I slept on all the curls and took a photo as soon as I unwound them. Joslin recommended that I gently finger shake my hair to separate the strands and hit them with a blast of hairspray to extend the style. "Brushing or combing your curls could ruin the time and effort put in," she said.

Here's what I found worked best.

Advertisement

The leggings method created more frizz than I'd bargained for.

The leggings method created more frizz than I'd bargained for.
The leggings method advises wrapping your hair around a pair of stretchy leggings and then tying them around your head.Lauren Finney Harden

Time to execute: 5 minutes
Difficulty: 6/10

This method calls for using the legs of leggings to wind the curls, and then the band of the leggings to seal them to your head. I wasn't able to start the curls as high as some of the others, and it took me several tries to wrap the curls. I also ran into trouble while sleeping.

Even with compression leggings, the entire thing slipped all over my head, causing a lot of frizz and discomfort in my sleep. Because of all these factors I had some errant straight pieces and the curls were uneven.

The scrunchie method is ideal for the lazy among us.

The scrunchie method is ideal for the lazy among us.
The scrunchie method is just a step above a regular scrunchy ponytail, which makes it basically foolproof.Lauren Finney Harden

Time to execute: 2 minutes
Difficulty: 1/10

I'd call the scrunchie method the lazy girl method, which is right up my alley. Instead of wrapping the scrunchy around my hair, I wrapped my hair around the scrunchie. I kept looping my hair around it until there was no more hair. It stayed very secure while sleeping. The curls were a little inconsistent but they were tight, and I'm into a more disheveled look.

Advertisement

The sock method was tough to get just right, but it produced great curls.

The sock method was tough to get just right, but it produced great curls.
The sock method = deceptively hard.Lauren Finney Harden

Time to execute: 6 minutes
Difficulty: 6/10

Using socks to wrap curls turned out to be harder than I anticipated. It took a couple of false starts before I was able to wrap them tight enough. Once I got going, it went quickly. I was surprised it didn't budge in my sleep, and I was really surprised how tightly the curls stayed.

The chopstick and sock method was the least comfortable to sleep on.

The chopstick and sock method was the least comfortable to sleep on.
The chopstick and sock method produced some of the tightest curls among the heatless curls methods tried.Lauren Finney Harden

Time to execute: 6 minutes
Difficulty: 5/10

This method promised to be easier and tighter than the sock method. It was marginally easier, though it took me a minute to figure out how to hold my hair. This is the only method that recommended I divide my hair into two sections and wrap each section around the chopstick as one piece, mimicking a curling iron barrel. I then folded the sock onto itself and secured with a scrunchie. It was by far the least comfortable style to sleep in, but the payoff might be worth it—the curls looked more uniform than the other styles.

Advertisement

The bun method left a lot to be desired.

The bun method left a lot to be desired.
The bun method failed to produce much of a curl at all.Lauren Finney Harden

Time to execute: 2 minutes
Difficulty: 1/10

In the bun method, you simply pull your hair into a ponytail and wrap sections of your hair around your finger, pinning each section into place. It was incredibly easy to do, and took me no time at all. However, my curls were fairly inconsistent as my pin curls weren't perfect, and despite using a scrunchie instead of a hair tie, there was a little crease where I had pulled my hair into a bun.

The robe method gave me a full head of wavy hair.

The robe method gave me a full head of wavy hair.
Lauren Finney Harden

Time to execute: 3 minutes
Difficulty: 3/10

The robe method involves taking a robe belt and winding your hair around it. I secured the ends with a scrunchie and then wrapped the remaining bits of the robe belt up around my head like a headband to secure it. This stayed surprisingly tight, and when I woke up I was amazed at how tight the curls were.

Advertisement

The satin tool method was the hardest of them all — despite involving the use of a tool designed especially to create heatless curls.

The satin tool method was the hardest of them all — despite involving the use of a tool designed especially to create heatless curls.
The satin tool: Just not worth it.Lauren Finney Harden

Time to execute: 5 minutes
Difficulty: 6/10

You might think buying a tool specifically for heatless curls would make your life easier, but I'm here to tell you the opposite is true. This was the hardest thing to hold in place–even with the clip—and the satin caused my hair to slip and slide everywhere. I had a hard time keeping the hair in place to wrap it, and when I went to lie down, my hair was already loose.

Joslin attributes this to there not being enough tension between the hair and the rod. "It's not ideal for most people," she says. I agree.

And the winners are...

And the winners are...
Three methods beat out the rest.Lauren Finney Harden

Heatless curls are a relatively easy way to change up your hair. You don't need anything fancy to achieve curls without heat damage — or a huge time commitment.

All seven methods I tried were, on the whole, easy to pull off. What surprised me is how difficult the satin tool was to use, as well as how beautiful the curls were from using scrunchies and socks.

Both the sock and socks and chopstick methods yielded great curls, but one method outshined the rest. The scrunchie method won it all, thanks to its relative ease and more natural-looking curls, which I prefer.

Advertisement